Metal etching using Flexible Texture
Mats from BestFlexible Molds.
If you’re a clay artist using
flexible texture mats and wondering what else you can do with them,
or if you’re into etching metal, but looking for cool new textures
and wondering if these flexible mats will work for you, the answer to
both questions is a resounding YES!
I love making patterned bead caps,
charms for earrings, pendants, and other findings to integrate into
my jewelry pieces. I frequently use copper, but occasionally
sterling or fine silver, bronze, nu gold, and brass, too.
 |
| Gingko leaves earring dangles and bead caps. |
There are many ways to etch metal, each
with their own distinct results. The two I commonly use are electric
etching using a saturated salt water solution and current, or using
Ferric chloride etchant. Ferric chloride is the faster of the two
solutions and the one I’ve used for the experiment I’m about to
cover.
I was in search of some new designs for
some bead caps I wanted to make, and as I frequently do, I searched
Etsy. I’d seen most of the patterns before, but I came across some
flexible texture mats designed specifically for clay products on the
Best Flexible Molds shop. A few really caught my eye. But I wanted
to etch copper. Would it work? I sent Penni Jo, the shop owner, a
note asking if she knew. She quickly replied that she really didn’t
know, but added she was now curious and asked if I would be willing
to experiment and share the results. I agreed and within a day or
two, four sample mats arrived.
When I opened the package, I felt
pretty comfortable that these would work out. I set out to do some
testing using all four of the samples mats I received. I was
delighted with the results! Here’s how the testing went:
First just a little disclaimer –
There are a ton of excellent and very detailed, step by step
tutorials on etching with Ferric chloride, so rather than reinvent
the wheel, I recommend the one I learned with on the Rings
& Things website.
What I’ll cover here are the
specifics around my experience and results using PenniJo’s flexible texture mats, generously provided!
Step 1 – Clean, buff and dry. Get
your copper squeaky clean.
I use a commercial copper cleaner called
Penny Brite® and a Scotchbrite® sponge, but you can also just sand it
with a fine grit sanding block followed, by some alcohol. You want
the water to sheet off – no beading up! Dry it thoroughly using
paper towels. Once it’s washed, handle with gloves to avoid the
transfer of any oils from your fingers.
Step 2 – Apply a resist to the
pattern on your flexible texture mat.
I used a StazOn® Ink pad,
pressing multiple times to get good coverage. Because the mat is so
flexible, I placed the copper on top of it, then placed a large
wooden block on top of the back side of the copper to apply even
pressure.

Berber texture resist results:
This is the first texture I used and
apparently, I didn’t press too well! Coverage is pretty uneven on
the left side. This is easy to fix, just using a Sharpie as you’ll
see later.

Faux Tooled Leather resist
results:
Once again, not enough ink or
insufficient pressure, but corrected later.

Center Cut Log resist results:
My goof here for not capturing the ink
applied to the texture mat, but you can see, I’m getting more
practiced at both the amount of resist and pressure to ensure a good
transfer. This looks pretty good.

Ginko Leaf resist results:
Getting consistently good transfer of
the resist achieving a high degree of coverage.

On the Berber and Tooled patterns,
remember that I was missing ink in quite a few places? Just using a
medium tip Sharpie, I filled in those missing areas.

Step 3 – Etching.
SAFETY IS A MUST!!! Ferric chloride is
a chemical and needs to be used and disposed of properly. It is toxic
and harmful to the environment, so it needs to be disposed of
according to your local laws. I drop it off to my city’s
hazardous material department for proper disposal.
Act
responsibly. Always thoroughly read about and understand any
chemicals you are working with to ensure your personal safety and no
harm to the environment. You can easily find the MSDS sheets on
the internet.
Make sure your resist is dry. For the
Ferric Chloride process I used, you need to “float” your etch
piece on top of the ferric chloride solution.
I secured two of mine using
double-sided carpet tape and two using the Rings & Things
approach. Both methods have pros and cons –experiment to see what
works best for you.

Step 4 – Place your pieces, design
side down, into your etchant.
Gently agitate your container by
jiggling it on the table every 10 minutes or so. Pull your pieces
out once you achieve the desired etch and clean them well, referring
to #8
in the Rings & Things tutorial.
After cleaning, here are my results. I
have to say, I’m very happy with the level of detail and depth of
etch I achieved using Penni Jo’s flexible texture mats.
I’m providing a side by side view of
the resist and the resulting etch after 60 minutes in the ferric
chloride bath.
 |
| Tx04 Nubby Berber texture Mat used |
 | |
| Tx01 Faux Tooled Leather texture mat used |
 |
| Tx08 Center Cut texture mat used |
 |
| Tx10 Gingko Leaves Texture mat used |
Step 5 is simply to shape and/or finish
your etched material for your particular application.
I’ll be
making a variety of jewelry components with these including bead
caps, pendants and earring charms. Here are a couple of examples:

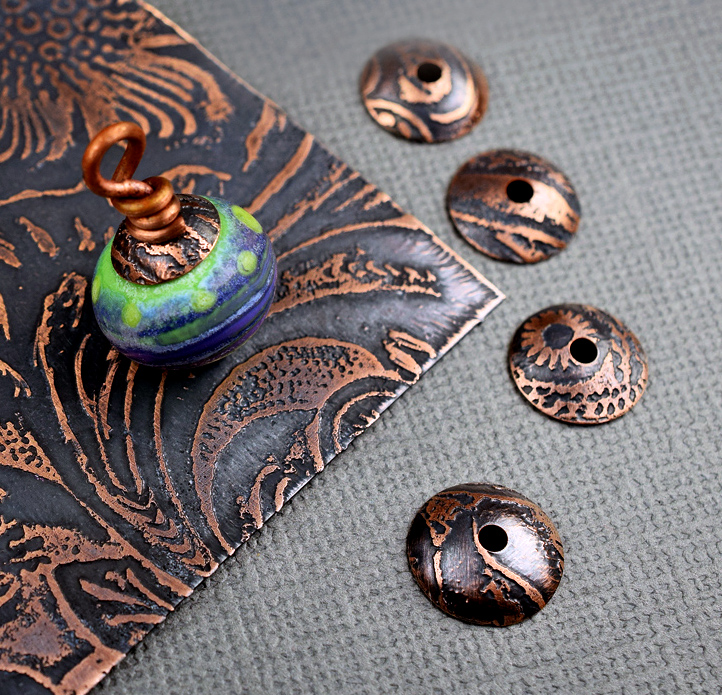
Bead caps made using the Center Cut
Oak texture mat with a various patina treatments (like Furubi®,
fuming, and flame patina).

I'm really very pleased with the
results using these flexible mats. I think they are definitely on
par with stamps and mats designed specifically for metal etching.
Have fun!
Debbie Bobby
Owner/maker, Bronze Bullet Design
www.bronzebulletdesign.com
Owner/maker, Bronze Bullet Design
www.bronzebulletdesign.com
A note from Penni Jo
Thank you so very much Debbie! The work you've done with these mats is amazing. The items you've created are beautiful and super functional. Joe and I are very pleased with the beautiful metal pieces that she has created.
Because our mats are hand poured, they might not be perfectly flat like commercially made mats or stamps. But it's my thought that if the material pressing the mats to the metal is rather flexible also, then more of the design could be imprinted on first try.
Because our mats are hand poured, they might not be perfectly flat like commercially made mats or stamps. But it's my thought that if the material pressing the mats to the metal is rather flexible also, then more of the design could be imprinted on first try.
No comments:
Post a Comment